Welcome to ADDMo’s documentation


ADDMo functional overview
ADDMo is an automated machine learning tool for regression tasks
ADDMo faces the following challenges:
Preprocessing of initial data (in some extent)
Selection of proper training and test data periods
Selection and creation of optimal features
Selection of a model, the model configuration
Hyperparameter tuning
Overfitting & underfitting
The used methods for facing those challenges are:
Data tuning
Preprocessing:
Scaling and normalizing: RobustScaler, StandardScaler & no scaling.
Period selection:
Time series plotting: Visualization of the target variable’s time series for detecting extraordinary patterns or mistakes in the data via matplotlib.
Custom period selection
Feature creation:
Creation of differences: Creation of feature derivatives.
Custom featurelag creation
Custom ownlag creation
Feature selection:
Low variance filter: Deletes features with low variance.
Custom feature selection of created features.
Independent component analysis: Separating of superimposed features.
Univariate filter: Several search and rating strategies for univariate filters.
Embedded recursive feature selection: Embedded multivariate feature selection using Random Forest where the elimination criteria is set to score or count (features).
ADDMo provides two tuning modes, both leveraging these preprocessing, feature creation, and selection options:
Automated Data Tuning:
Applies preprocessing steps (e.g., lag creation, difference features) and lets you choose between manual or automated feature selection strategies.
Fixed Data Tuning:
Uses the same general fields as Auto Tuning, but with manual, user-defined control over key feature construction and selection steps such as create_lag, create_diff, and create_squared.
Detailed configuration guide available directly in the GUI tab.
Model tuning
Importing the previously tuned data, training the model with optimizing the hyperparameters and evaluate the model via out-of-sample predictions. Mention the tuned data path (default or custom) in the config to train model on tuned data.
Pipeline:
Model selection: Exhaustive wrapper for selecting the best out of all implemented models.
Hyperparameter tuning: via bayesian optimization or grid search
Cross-validation: prevent overfitting
All those methods are applied sequentially while each method is optional, thus ensuring that any combination can be selected.
The implemented models are
multi layer perceptron (ANN)
epsilon support vector regression (SVR)
Insights
Generate insightful visualizations based on the results of previously trained and saved models. One can generate insights on models trained by ADDMo or external frameworks (only Scikit and Keras models supported).
One can define bounds and default values for the features manually or select the existing min and max of each feature as bound and mean (numerical features) or mode (categorical features) as default values.
Testing
Test a previously trained and saved model using new or unseen input data and predict and evaluate the model with a more sophisticated evaluation method. While using the GUI, Select Tuning Type is critical if the model was trained on tuned data. Specify the tuning type and the path where the tuned data file is saved. The file is loaded to recreate the data tuning automatically.
This way the model is trained and tested on the same features and ensures the tuning type and input structure match the training phase.
Recreate Data Tuning
Allows recreating the exact data tuning process applied during a previous experiment, using the saved tuning configuration.
This step is already handled in the Testing phase. This functionality only supports tuning configurations saved by this app.
It cannot recreate tuning from externally trained models or configurations.
The flowchart below depicts the workflow of the tool:
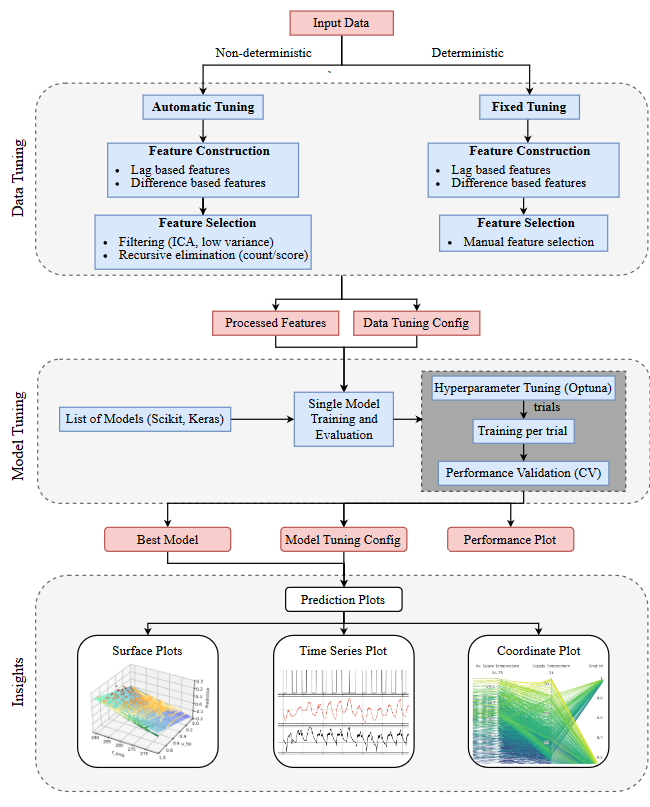
The tool is mainly designed to perform modelling on time series data, via regression and time series analysis. Nevertheless it can also be used to handle data indexed by an id, simply converting the id into a timestamp (pandas.datetimeindex convention).
Note: The tool is single output only (no MIMO). It has no natively recurrent model, means it only uses ownlags as a regular input for regression analysis (A native recurrent model would be e.g. long short term memory neural networks)
How to set it up
Clone the repository
git clone https://git-ce.rwth-aachen.de/ebc/ebc-general/machine-learning/addmo-automated-ml-regression.gitCreate new environment using venv or conda
Using venv:
python3 -m venv .venv
source .venv/bin/activateUsing conda:
Open command line and create a python 3.10 or above environment via:conda create --name ADDMo python=3.10Type y for accepting to install first packages:
yActivate environment:
conda activate ADDMoChange directory in command line to the project path using:
cd <Path to your local ADDMo repo>Install required packages via:
pip install -e .Set the conda environment “ADDMo” as interpreter for e.g. in PyCharm
Plotting Caution:
Some users might face matplotlib interface errors while executing plotting scripts in GUI, such as not being able to view the plots. If encountering such an error, try downgrading matplotlib to 3.9
How to use the tool
Executing this command in the terminal where your virtual environment is activated will launch the GUI: addmo-gui
These execution files works exactly like the GUI tabs. In order to perform specific functionalities, change the saved config.json file under
each config tab in the ADDMo folder.
For example: For changing the config for Auto Data Tuning, change the file here: addmo-automated-ml-regression\addmo\s1_data_tuning_auto\config\data_tuning_auto_config.json
Executive scripts are:
exe_data_tuning_auto.pyfor automatically tuning the data.exe_data_tuning_fixed.pyfor tuning the data in a fixed manner.exe_model_tuning.pyfor training a list of models and saving the best performing model.exe_data_insights.pyfor generating several insightful plots for interpreting the model performance.exe_model_testing.pyfor predicting new data values on trained model.exe_recreate_data_tuning.pyfor recreating the same features on new data based on saved tuned data
Information about the required input shape:
Input CSVFile has to be named: “InputData” and saved in the Folder
addmo_examples/raw_input_dataThe time must be in the format of “pandas.datetimeindex”. If the time is in seconds, convert it into DD-MM-YY format.
Columns must have different names
Understanding the handling of saving the results:A folder called results is created within the directory (addmo-automated-ml-regression\addmo_examples) of the python files. Within that folder a four layered folder system is used, the next layer is a subfolder of the respective previous layer. The folder are created by the program, only their names must be defined:
Layer0:
Results: general folder for all resultsLayer0:
raw_input_data: name of the folder used to declare which input data is used for the results within.Layer1:
name_of_raw_data: name of the folder in which the results of all executions for a particular run are saved, including the “Data Tuning” which will be the input for model tuning. “Model Tuning” and “Data Insights” results are saved as different folders under this folder.Layer2:
name_of_tuning: name of the folder in which the results of “Data Tuning” are saved.Layer2:
name_of_data_tuning_experiment: name of folder in which different “Model Tuning” experiment folders are created. This folder helps in keeping track of which model tuning is used for a specific dataset and helps you create multiple experiments using different models but the using the same tuned data.Layer3:
name_of_model_tuning_experiment: name of folder in which results of “Model Tuning” are saved.Layer4:
plots: name of the folder in which the results of plotting are saved.
An example of how the structure looks like:
addmo_examples/
└── raw_input_data/
└── results/
    └── test_raw_data/             # name_of_raw_data
            └── data_tuning_experiment_fixed/      # name_of_tuning (tuned data is stored here)
            └── test_data_tuning_fixed/     # name_of_data_tuning_experiment (models trained on fixed tuned data is stored here)
                    └── ScikitMLP_fixed_tuning/        # name_of_model_tuning_experiment (all files regarding a specifc trained model)
                        └── plots/        # plots generated using ScikitMLP are stored here
            └── SciKeras_fixed_tuning/
                └── plots/
Cite ADDMo:
If you use ADDMo in scientific publication, we would appreciate citations to the following paper:
Automated data-driven modeling of building energy systems via machine learning algorithms, Rätz et al., Energy and Buildings, Volume 202, 2019.
Published at Energy&Buildings Journal: Link to article
If you are not granted access to the paper, you may find the pre-print at: Link to pre-print article at researchgate